
This tutorial will cover how to use the on-board temperature sensor on the RP2040 chip which is the heart of the Raspberry Pi Pico. You can find the full source code for this project at the bottom of the page.
Introduction to the Temperature Sensor
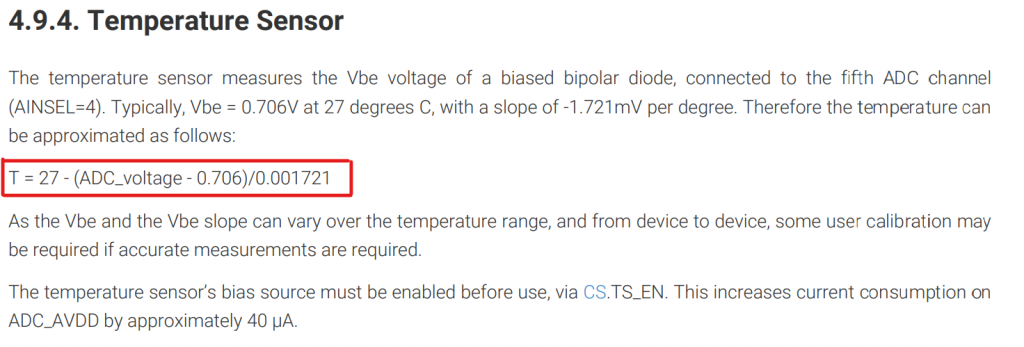
The temperature sensor works by measuring the voltage of a diode in the chip itself, so straight off the bat we aren’t really measuring the ambient room temperature. We are measuring the temperature of the chip itself instead.
In order to read the temperature of the diode, we take the diode’s voltage output (from the fifth ADC channel) and convert this voltage to temperature using the following equation:
CMakeLists File
We will create a project as explained in this video tutorial.
Starting with the CMakeLists file we use the standard format and add the following libraries:
- Pico Standard Libraries
- Hardware ADC
We also enable the USB serial output. When in the target_link_libraries function it looks like this:
target_link_libraries(TempSense
    pico_stdlib
    hardware_adc
)

pico_enable_stdio_usb(TempSense 1)
pico_enable_stdio_uart(TempSense 0)
C File
We want to include the following libraries:
#include <stdio.h>
#include "pico/stdlib.h"
#include "hardware/adc.h"
Now we write our main function:
int main(void){

}
Then the first thing we do in the main function is to initialise the stdio, then initalise the ADC and enable the temperature sensor. We also set the ADC input to 4 which corresponds to the 5th ADC channel.
int main(void){
    stdio_init_all();

    // Configure ADC
    adc_init();
    adc_set_temp_sensor_enabled(true);
    adc_select_input(4);
}
Now we create an infinte while loop whose contents takes the raw ADC outputs, converts this into a voltage, then converts this voltage into a temperature. The printf function then sends the result over the USB serial interface (see a tutorial on this here).
while(1){
    uint16_t raw = adc_read();
    const float conversion_factor = 3.3f / (1<<12);
    float result = raw * conversion_factor;
    float temp = 27 - (result -0.706)/0.001721;
    printf("Temp = %f C\n", temp);
    sleep_ms(1000);
}
As a note, the const qualifier is used to tell the compiler that the variable proceeding this qualifier will not change. This is useful when the compiler does some code optimisation.
Now your project is set up to measure the temperature of the RP2040! You can now build this project and upload it to the Pico. Open your serial monitor of choice and point it to the COM port your pico is connected to. The baud rate will be 115,200. You should see a temperature output that now goes up or down when you change the chip temperature.
The temperature sensor isn’t calibrated, and my values appear to be 10 degrees lower than my room temperature almost across the board. I would expect there to be a wide difference across different Pico’s due to manufacturing inconsistencies. The datasheet does say that calibration will be required. If you were going to use this in a serious project, I would highly recommend that you use an external sensor like one of the BMPs from Bosch SensorTech.
Project Source Code
CMakeLists.txt
cmake_minimum_required(VERSION 3.12)

include(pico_sdk_import.cmake)

project(pico-TempSense)

pico_sdk_init()

add_executable(TempSense
    TempSense.c
)

target_link_libraries(TempSense
    pico_stdlib
    hardware_adc)

pico_enable_stdio_usb(TempSense 1)
pico_enable_stdio_uart(TempSense 0)

pico_add_extra_outputs(TempSense)
TempSense.c
#include <stdio.h>
#include "pico/stdlib.h"
#include "hardware/adc.h"

// Core 0 Main Code
int main(void){
    stdio_init_all();

    // Configure ADC
    adc_init();
    adc_set_temp_sensor_enabled(true);
    adc_select_input(4);

    // Primary Core 0 Loop
    while(1){
        uint16_t raw = adc_read();
        const float conversion_factor = 3.3f / (1<<12);
        float result = raw * conversion_factor;
        float temp = 27 - (result -0.706)/0.001721;
        printf("Temp = %f C\n", temp);
        sleep_ms(1000);
    }
}
Great Tutorial! Thank you.
The file “pico_sdk_import.cmake” must be in the projects directory.
I copied from pico-examples.
At Pico console (Visual Studio Code) :
Searching for boards on serial devices…
No boards found on USB
Connecting to COM3…
Temp = 19.180138 C
Temp = 18.711992 C
Temp = 19.180138 C
Temp = 19.180138 C