Please note this article is a work in progress and will change over the coming days
In this guide we detail how to make a solar powered weather station using the Cicerone board and LoRaWAN. This is the written version of the project featured in this video:
Build list
To make this project we need the following items:
- Cicerone board: https://www.move-x.it/cicerone-board/
- LiPo battery: https://amzn.to/3EzEgpw
- Solar charger: https://shop.pimoroni.com/products/adafruit-universal-usb-dc-solar-lithium-ion-polymer-charger-bq24074?variant=32236671828051
- Solar panel: https://uk.rs-online.com/web/p/solar-panels/1860599
- Arduino MKR ENV board: https://store.arduino.cc/products/arduino-mkr-env-shield-rev2
- 868MHz antenna: https://uk.rs-online.com/web/p/telemetry-antennas/1251251
- Assorted cables (mainly a USB to barrel connector – I made one from two cables).
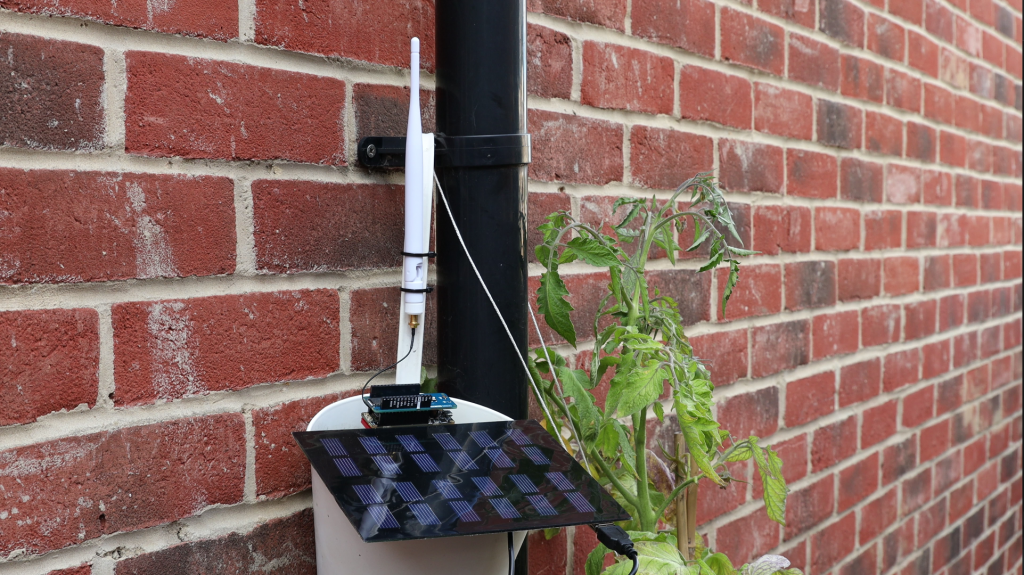
Assembly
Now comes the fun part! Assembling everything is nice and easy, the LiPo battery connects to the LiPo port on the solar charger. The solar panel connects to the barrel connector. The cicerone board connects via a 2mm JST to JST cable and the ENV shield slots directly into the Cicerone board. The antenna connects via the ufl connector in the MAMWLE module.
Programming
We used the new Arduino IDE version 2 in this project and it worked like a charm. We need to add the Cicerone board to the Arduino board manager. This is done by clicking the following button in the Arduino IDE preferences:
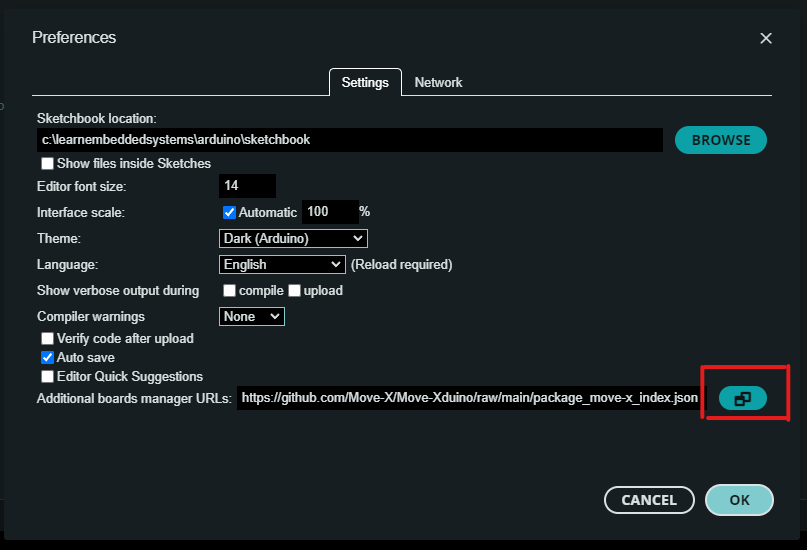
In the dialogue box that opens, add the following URL and then press OK. The board should now install.
https://github.com/Move-X/Move-Xduino/raw/main/package_move-x_index.jsonFinal code – Arduino IDE
Here is the final code in the project, copy paste this into your project, remember to set your LoRaWAN keys. Then compile and upload!
#include <LibLoRaWAN.h>
#include <Arduino_MKRENV.h>

bool net_joined = false; // will store join status

void userloop();

// Set your LoRaWAN keys here
uint8_t devEUI[] = {0x00, 0x00, 0x00, 0x00, 0x00, 0x00, 0x00, 0x00};
uint8_t appEUI[] = {0x00, 0x00, 0x00, 0x00, 0x00, 0x00, 0x00, 0x00};
uint8_t appKEY[] = {0x00, 0x00, 0x00, 0x00, 0x00, 0x00, 0x00, 0x00, 0x00, 0x00, 0x00, 0x00, 0x00, 0x00, 0x00, 0x00};
uint8_t nwkKEY[] = {0x00, 0x00, 0x00, 0x00, 0x00, 0x00, 0x00, 0x00, 0x00, 0x00, 0x00, 0x00, 0x00, 0x00, 0x00, 0x00};

void setup()
{
  Serial.begin(115200);

  if (!ENV.begin()) {
    Serial.println("Failed to initialize MKR ENV Shield!");
    while (1);
  }

  Serial.println("Init LoRaWAN");
  LoRaWAN.attachLoop(userloop);
  LoRaWAN.begin(false); // Add &Serial as second parameter to enable debug messages on console

  if (LRW_OK != LoRaWAN.setRegion(LRW_REGION_EU868))
    Serial.println("setRegion() error!");

  if (LRW_OK != LoRaWAN.setDevEUI(devEUI))
    Serial.println("setDevEUI() error!");

  if (LRW_OK != LoRaWAN.setJoinEUI(appEUI))
    Serial.println("setJoinEUI() error!");

  if (LRW_OK != LoRaWAN.setAppKey(appKEY))
    Serial.println("setAppKey() error!");

  if (LRW_OK != LoRaWAN.setNwkKey(nwkKEY))
    Serial.println("setNwkKey() error!");

  if (LRW_OK != LoRaWAN.Join(LRW_JOIN_OTAA))
    Serial.println("Join() error!");


}

void loop()
{
  LoRaWAN.process();
}

void userloop() {


  if (!net_joined)
  {
    /* Update join status */
    if (LRW_OK == LoRaWAN.NetJoined()) {
      net_joined = true;
      Serial.println("Net Joined");
    }
  }
  else
  {
    char temp_buffer[7];
    char humi_buffer[7];
    char pres_buffer[8];
    char illu_buffer[8];
    char buffer[26];
    buffer[0] = 0;

      // Read Sensor Data and convert to string format
    float temperature = ENV.readTemperature();
    float humidity    = ENV.readHumidity();
    float pressure    = ENV.readPressure();
    float illuminance = ENV.readIlluminance();

    dtostrf(temperature, 0, 2, temp_buffer);
    dtostrf(humidity, 0, 2, humi_buffer);
    dtostrf(pressure, 0, 2, pres_buffer);
    dtostrf(illuminance, 0, 2, illu_buffer);

    strcat(buffer, temp_buffer);
    strcat(buffer, humi_buffer);
    strcat(buffer, pres_buffer);
    strcat(buffer, illu_buffer);

   // Send sensor data
       if (LRW_OK != LoRaWAN.Send(111, LRW_UNCONFIRMED_MSG, (uint8_t*)buffer, sizeof(buffer))) {
         Serial.println("Send() error!");
       }

    delay(1800000);
  }
}
Final Code – TTN Payload Formatter
In order to decode this information, we used the following code:
function Decoder(bytes, port) {

  var text1 = String.fromCharCode.apply(null, bytes.slice(0, 5));
  var text2 = String.fromCharCode.apply(null, bytes.slice(5, 10));
  var text3 = String.fromCharCode.apply(null, bytes.slice(10, 16));
  var text4 = String.fromCharCode.apply(null, bytes.slice(16, 22));

  return {
    field1: parseFloat(text1),
    field2: parseFloat(text2),
    field3: parseFloat(text3),
    field4: parseFloat(text4)
  }
}
This is then sent to a thingspeak channel where the data can be visualised.
Conclusion
So that is our programming done, now we can move the weather station outside and start gathering data!