In a previous project we created a Raspberry Pi IoT server which takes sensor data collected remotely over a WiFi network using the MQTT protocol and stored it before plotting it nicely in a Grafana dashboard. An extension of this project could be accessing the recorded sensor data remotely, i.e. not on the same network as the server. There are many ways that this could be achieved, perhaps a VPN into the network would be a solution. However, this can open a possible vulnerability into your network if you don’t configure it correctly. Another solution is to use the popular messaging platform Telegram to interact with your IoT server.
This tutorial directly follows on from the IoT server tutorial but it is not a prerequisite. I will provide a method to interact with a telegram bot to command your IoT server. In my configuration, I created an alert to notify me if one of my sensor nodes disconnects from the network. I also created a method of querying an InfluxDB database for the latest sensor data.
Tutorial
Baseline Node-RED flow

In this basic flow, a node is subscribed to the “/home/sensors” MQTT topic. When a message from the topic is received, it is formatted in a change node and then passed to an InfluxDB database where it is stored. This database is then used as a Grafana data source to plot the sensor data and will be the same database we query to send data to the user through the telegram bot.
Required Node-RED plugins
You will need the node-red-contrib-telegrambot plugin which you can install from the palette manager (alt + shift + p).
In some docker configurations there can be an error when trying to download external plugins. This can be due to the docker container not knowing where the DNS server is. This can be solved by creating a file called daemon.JSON in /etc/docker with the following IPs (primary and secondary DNS servers).
{
    "dns": ["XXX.XXX.X.XX", "X.X.X.X"]
}
Telegram bot creation
To create our telegram bot we need to message the @botfather bot with the following commands (each line is a separate message):
/newbot
<bot name>
<unique bot username>
After sending these commands to the bot you will receive a success message containing a HTTP API key, note this down. Keep this key to yourself, anyone who has access to this key can control your bot.
Next we need to find our telegram chat ID. To do this simply message the @myidbot the command:
/getidTelegram Sender Node & Node-RED trigger node
The Node-RED trigger node can be used to count intervals between messages and send a message once a certain time has elapsed. With this node connected to a telegram sender node we can send a message when no sensor data is received for a minute or so. The resulting flow looks like this:

The trigger node properties are shown in the image below. We set the node to initially send nothing when a message is received and then wait for a minute (or whatever timeout you want) and then we send a JSON message.
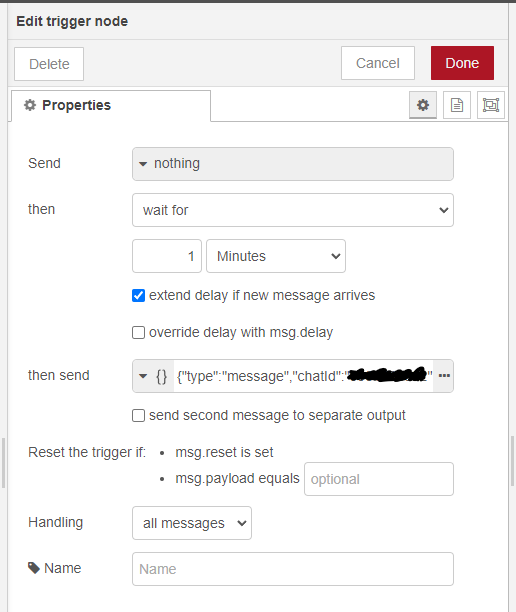
The message that the Telegram sender node requires in the following format. Put this in the “then send” field. The chat ID tells your telegram bot who to send the message to, so put your chat ID here. Obviously you can put what you like in the content field.
{
"type": "message",
"chatId": "XXXXXXXXXX",
"content": "Office sensor timed out"
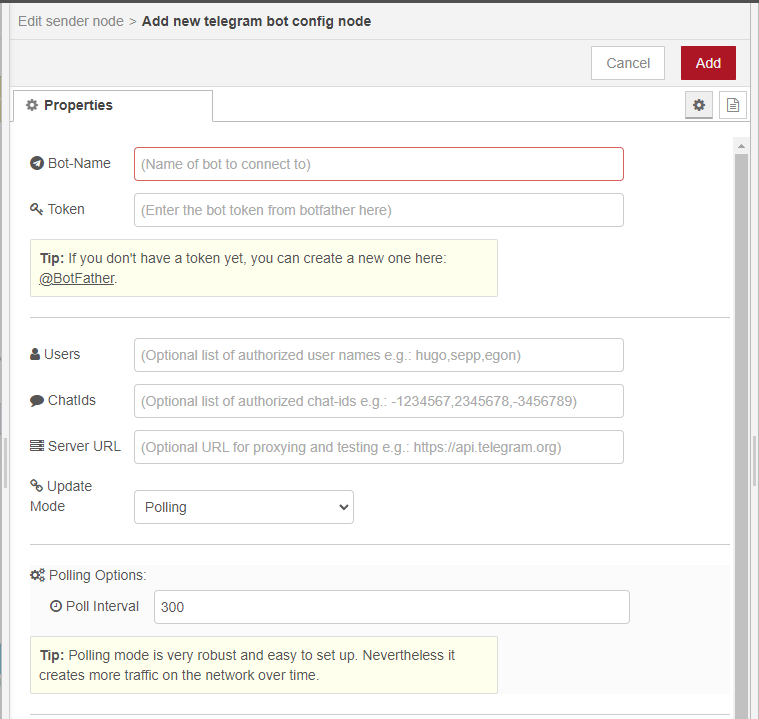
}In the telegram sender node we need to add our telegram bot. In the bot drop-down, select add new bot. In the new bot panel we need to add the bot username, then the HTTP API key that you recorded earlier. The user and chatIds fields can be used to secure your implementation by only allowing specific users and/or chats to interact with your Node-RED implementation.
Once you have added your bot, you can deploy the flow and test this by simply disconnecting a sensor and waiting for the telegram notification to come through!
Messaging the telegram bot
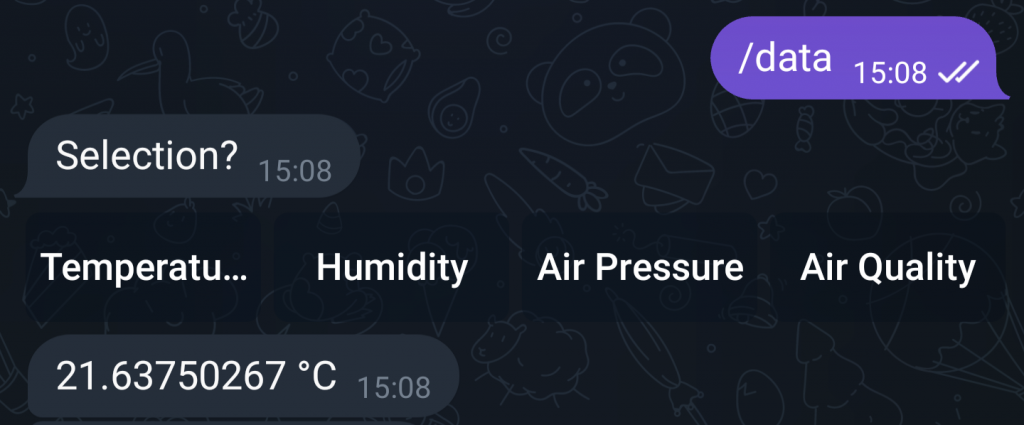
Moving into more interactive territories, we are going to create a flow which will wait for a command from a user and then return a keyboard of options to the user. This keyboard will contain options for types of sensor data the user wants to receive. In our example that is temperature, pressure, humidity and air quality (gas resistance). When the user makes their selection, the latest value for that sensor reading is queried from an InfluxDB database and returned as a message.

The first line uses the command node listening for the “/data” command from the user, then the function node uses the following code to return a keyboard to the user:
var opts = {
    reply_markup: JSON.stringify({
        "inline_keyboard": [[
            {
                "text": "Temperature",
                "callback_data": "1"
            },
            {
                "text": "Humidity",
                "callback_data": "2"
            },
            {
                "text": "Air Pressure",
                "callback_data": "3"
            },
            {
                "text": "Air Quality",
                "callback_data": "4"
            }]
        ]
    })
};

msg.error = false;

msg.payload.content = 'Selection?';
msg.payload.options = opts;
msg.payload.chatId = XXXXXXXXXX;
msg.payload.type = "message";

return [msg];
Note the different callback values for each option. This message is then routed into the telegram sender node.
The second line waits for the response from the users using the event node with the “callback query” event selection. The following function moves the incoming message to another property in the message to avoid it being overwritten.
msg.callback = msg.payload;
return msg;
This message is then passed into the InfluxDB In node which has the following query to return the latest row in the table of sensor data:
select * from office group by * order by time desc limit 1The next function is simply a series of if statements to select which entry the user wanted with this code:
if(msg.callback.content == 1){
    msg.payload.content = msg.payload.results[0].series[0].values[0][4] + " °C";
}
if (msg.callback.content == 2) {
    msg.payload.content = msg.payload.results[0].series[0].values[0][2] + "%";
}
if (msg.callback.content == 3) {
    msg.payload.content = msg.payload.results[0].series[0].values[0][3] + "kPa";
}
if (msg.callback.content == 4) {
    msg.payload.content = msg.payload.results[0].series[0].values[0][1];
}


msg.payload.type = "message";
msg.payload.chatId = "XXXXXXXXXX";
return msg;
Finally, the output of this function is routed into a telegram sender node! You should now be all set up to use all the telegram bot features. Hit deploy and give it a test!
TIP: Use Node-RED debug nodes to check how the messages between nodes in your flow are working!