Introduction
This is a basic tutorial which will show you how to set up the VSCode environment to be able to compile, link and use FreeRTOS in your RP2040 based projects. This tutorial won’t go too much into the weeds about how FreeRTOS works, that is for our next tutorial. However, in this tutorial we are first going to set up VSCode then write a basic blink program to validate that our setup is working.
Template Repo Link
This project is intended as a template for starting other FreeRTOS RP2040 projects. If you would like to directly download the template without following the tutorial then you can clone the directory using the following:
git clone --recurse-submodules https://github.com/LearnEmbeddedSystems/rp2040-freertos-projectFile/Folder Structure
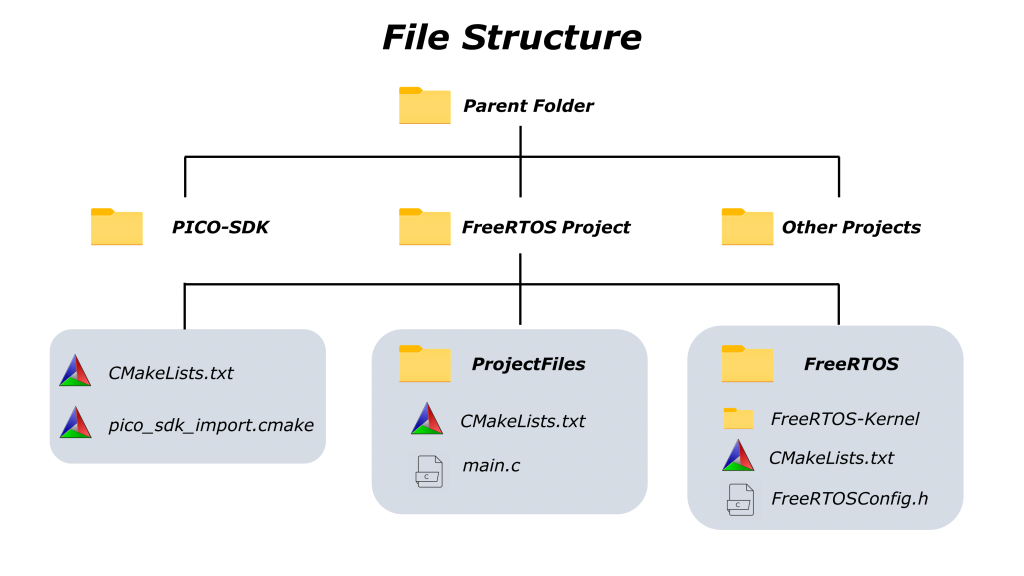
We first create a project folder where you usually do (where the Pico SDK is already configured. We are covering the FreeRTOS Project folder. Then in that folder create two sub-folders, one for your project files and another called FreeRTOS. The folder structure is shown below for your reference.
Next we need to clone the FreeRTOS kernel. To do this, navigate to the “FreeRTOS” folder in command prompt and run the following command:
git clone https://github.com/FreeRTOS/FreeRTOS-KernelYou should now have a folder called FreeRTOS-Kernel withing the FreeRTOS folder you just created.
CMakeLists Files
There are three CMakeLists files that we have to create in order to build our project. Please note that if you change any of the folder names then their corresponding entries in the CMakeList.txt files must also be changed.
Parent CMakeList
I have called this “CmakeLists.txt” file the “parent” file as it is located in the top project file.
cmake_minimum_required(VERSION 3.12)

include(pico_sdk_import.cmake)

project(Pico-FreeRTOS)

pico_sdk_init()

add_subdirectory(freertos)
add_subdirectory(ProjectFiles)
ProjectFiles CMakeList
This second “CmakeLists.txt” file is located in the ProjectFiles folder alongside the main.c file.
add_executable(blink
        main.c
)

target_link_libraries(blink pico_stdlib freertos)
pico_add_extra_outputs(blink)
FreeRTOS CMakeLists
The final “CmakeLists.txt” file is located in the “freertos” folder and contains the following:
set(PICO_SDK_FREERTOS_SOURCE FreeRTOS-Kernel)

add_library(freertos
    ${PICO_SDK_FREERTOS_SOURCE}/event_groups.c
    ${PICO_SDK_FREERTOS_SOURCE}/list.c
    ${PICO_SDK_FREERTOS_SOURCE}/queue.c
    ${PICO_SDK_FREERTOS_SOURCE}/stream_buffer.c
    ${PICO_SDK_FREERTOS_SOURCE}/tasks.c
    ${PICO_SDK_FREERTOS_SOURCE}/timers.c
    ${PICO_SDK_FREERTOS_SOURCE}/portable/MemMang/heap_3.c
    ${PICO_SDK_FREERTOS_SOURCE}/portable/GCC/ARM_CM0/port.c
)

target_include_directories(freertos PUBLIC
    .
    ${PICO_SDK_FREERTOS_SOURCE}/include
    ${PICO_SDK_FREERTOS_SOURCE}/portable/GCC/ARM_CM0
)
FreeRTOSConfig.h File
This file contains configuration options for FreeRTOS. You can leave them as-is for now as later on in our tutorial series we will cover some of these options in more detail. If you know what you are doing then go ahead however!
#ifndef FREERTOS_CONFIG_H
#define FREERTOS_CONFIG_H

/* Use Pico SDK ISR handlers */
#define vPortSVCHandler         isr_svcall
#define xPortPendSVHandler      isr_pendsv
#define xPortSysTickHandler     isr_systick

#define configUSE_PREEMPTION                    1
#define configUSE_PORT_OPTIMISED_TASK_SELECTION 0
#define configUSE_TICKLESS_IDLE                 0
#define configCPU_CLOCK_HZ                      133000000
#define configTICK_RATE_HZ                      100
#define configMAX_PRIORITIES                    5
#define configMINIMAL_STACK_SIZE                128
#define configMAX_TASK_NAME_LEN                 16
#define configUSE_16_BIT_TICKS                  0
#define configIDLE_SHOULD_YIELD                 1
#define configUSE_TASK_NOTIFICATIONS            1
#define configTASK_NOTIFICATION_ARRAY_ENTRIES   3
#define configUSE_MUTEXES                       0
#define configUSE_RECURSIVE_MUTEXES             0
#define configUSE_COUNTING_SEMAPHORES           0
#define configQUEUE_REGISTRY_SIZE               10
#define configUSE_QUEUE_SETS                    0
#define configUSE_TIME_SLICING                  0
#define configUSE_NEWLIB_REENTRANT              0
#define configENABLE_BACKWARD_COMPATIBILITY     0
#define configNUM_THREAD_LOCAL_STORAGE_POINTERS 5
#define configSTACK_DEPTH_TYPE                  uint16_t
#define configMESSAGE_BUFFER_LENGTH_TYPE        size_t

/* Memory allocation related definitions. */
#define configSUPPORT_STATIC_ALLOCATION         0
#define configSUPPORT_DYNAMIC_ALLOCATION        1
#define configAPPLICATION_ALLOCATED_HEAP        1

/* Hook function related definitions. */
#define configUSE_IDLE_HOOK                     0
#define configUSE_TICK_HOOK                     0
#define configCHECK_FOR_STACK_OVERFLOW          0
#define configUSE_MALLOC_FAILED_HOOK            0
#define configUSE_DAEMON_TASK_STARTUP_HOOK      0

/* Run time and task stats gathering related definitions. */
#define configGENERATE_RUN_TIME_STATS           0
#define configUSE_TRACE_FACILITY                0
#define configUSE_STATS_FORMATTING_FUNCTIONS    0

/* Co-routine related definitions. */
#define configUSE_CO_ROUTINES                   0
#define configMAX_CO_ROUTINE_PRIORITIES         1

/* Software timer related definitions. */
#define configUSE_TIMERS                        1
#define configTIMER_TASK_PRIORITY               3
#define configTIMER_QUEUE_LENGTH                10
#define configTIMER_TASK_STACK_DEPTH            configMINIMAL_STACK_SIZE

/* Define to trap errors during development. */
#define configASSERT( x )

/* Optional functions - most linkers will remove unused functions anyway. */
#define INCLUDE_vTaskPrioritySet                1
#define INCLUDE_uxTaskPriorityGet               1
#define INCLUDE_vTaskDelete                     1
#define INCLUDE_vTaskSuspend                    1
#define INCLUDE_xResumeFromISR                  1
#define INCLUDE_vTaskDelayUntil                 1
#define INCLUDE_vTaskDelay                      1
#define INCLUDE_xTaskGetSchedulerState          1
#define INCLUDE_xTaskGetCurrentTaskHandle       1
#define INCLUDE_uxTaskGetStackHighWaterMark     0
#define INCLUDE_xTaskGetIdleTaskHandle          0
#define INCLUDE_eTaskGetState                   0
#define INCLUDE_xEventGroupSetBitFromISR        1
#define INCLUDE_xTimerPendFunctionCall          0
#define INCLUDE_xTaskAbortDelay                 0
#define INCLUDE_xTaskGetHandle                  0
#define INCLUDE_xTaskResumeFromISR              1

/* A header file that defines trace macro can be included here. */

#endif /* FREERTOS_CONFIG_H */
pico_sdk_import.cmake file
In the top project folder make sure to include the pico_sdk_import.cmake file which is available in the Pico-SDK or in the example Pico projects from the Raspberry Pi Foundation.
Main.c File
This file acts just like any other blinky main.c file you have created before however the way it acts are slightly different.
#include <FreeRTOS.h>
#include <task.h>
#include <stdio.h>
#include "pico/stdlib.h"


void led_task()
{
    const uint LED_PIN = PICO_DEFAULT_LED_PIN;
    gpio_init(LED_PIN);
    gpio_set_dir(LED_PIN, GPIO_OUT);
    while (true) {
        gpio_put(LED_PIN, 1);
        vTaskDelay(100);
        gpio_put(LED_PIN, 0);
        vTaskDelay(100);
    }
}

int main()
{
    stdio_init_all();

    xTaskCreate(led_task, "LED_Task", 256, NULL, 1, NULL);
    vTaskStartScheduler();

    while(1){};
}
We have two main functions, the main function as we would expect, and an led_task function. The led_task function contains basic code to blink the LED on the Raspberry Pi Pico on and off. However, this function isn’t called in the usual way in main. Instead, a task is created using the xTaskCreate function and before the RTOS task scheduler is started which triggers led_task to run.
Conclusion
Now you are ready to build your project. If CMake hasn’t automatically configured your environment then you can force it to by pressing ctrl+shift+P to open the command palette. Then type “cmake” and select the configure option. Once configured, you can build the project using the build button on the bottom toolbar.
Once your project has built, you can upload it to your RP2040 board! So hopefully now you know how to set up a FreeRTOS project! Stay tuned for more FreeRTOS tutorials on the RP2040.
watched the YT video so I attempted to follow the website instructions. You need to fix the File Structure graphic since upper lowercase matters (folder freertos is all lowercase, PICO-SDK not needed or it has to be all lowercase, Other Projects folder not needed). You use the word ‘project’ in text and I have no idea if it is a folder or not. I will try to figure out where each file goes and hope I’m successful. Contact me if you have a simple solution where each file goes into what folder. Thanks.
Hi,
This is a great tutorial. I have a question:
I got the error at #include “pico/stdlib.h”
Here is the error: “#include errors detected. Please update your includePath. Squiggles are disabled for this translation unit ”
Do you have any ideas?
Thanks
Hello, can you please add tutorial how to setup tools for freertos and how to upload the code? So far everything is good, except that we cannot make it work on our pc.
thanks